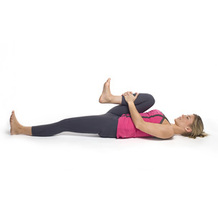
 The following stretching routine is really effective for those suffering from an achy, stiff lower back, doing this routine regularly will really help to stretch out all the muscles that may be tight, tense and contributing to low back pain. 1. Ardha apanasana (knee-chest pose). Start lying down on the floor, wearing loose, comfortable clothing and remove shoes and socks. Start with both feet flat on the floor and hug the right knee in towards the chest, this helps to stretch the gluteal muscles, if you have limited flexibility stay with the left knee bent, if you have more range of motion lengthen the left leg long actively pressing the thighbone down towards the ground. Keep the head and shoulders relaxed down to the ground and stay for 20-30 seconds before switching to the other side. 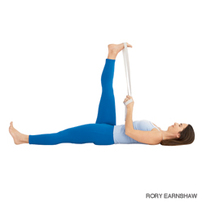 2. Supta padangusthasana (hamstring stretch). Grab a yoga strap if you have one, if not you can use a tie or a dressing gown strap or anything else that resembles a strap and place it around the big and little toe mound, straightening the leg to create a stretch in the hamstring, if you have very tight hamstrings start with the bottom leg bent and the foot flat on the floor, for those with more flexibility lengthen the bottom leg along the floor and actively press the thigh towards the ground. Relax the shoulders here and stay for as long as 5-10 breaths or between 30-60 seconds per side. 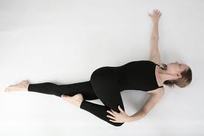 3. Supta matsyendrasana (supine twist). Draw your right knee in towards your chest and release the knee over to the left, take your right arm out to the side and rest your left hand on your right knee to create an anchor, if the knee doesn't come all the way down to the ground you may place a pillow or blankets underneath so that it doesn't feel like it is hanging in mid-air. Release your right shoulder down to the ground and if its comfortable on your neck gaze over your right shoulder, stay for 5-10 breaths before switching to the other side. 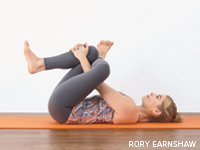 4. Sucirandrasana (eye of the needle pose). Place both feet back on the floor and place your right ankle onto the top of the left thigh, if you begin to feel a stretch here then stay just gently guiding your right thigh away from your face with your right hand, if you want more of a stretch thread the hands or a strap around the left thigh guiding the left knee in towards the chest as you use your right elbow to guide the right elbow away from your head. You should feel sensation into the outer right hip, lengthening the lateral rotators of the hip particularly the piriformis muscle which can get tight and impinge on the sciatic nerve causing piriformis syndrome. Stay here for 5-10 breaths, just breathing into the strong sensations in the hip area, then repeat on the opposite side. 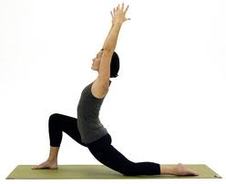 5. Anjayanasana (hip flexor stretch). If you spend a lot of time sitting chances are your hip flexors are going to be tight. Starting off from hands and knees bring your right foot in between your hands, take your back knee back enough so you can begin to feel a sense of opening on the front of the left thigh, place your hands either on your front thigh or on your hips and allow the pelvis to release down as you lengthen your tailbone down and begin to peel your belly away from your front thigh. Keep your hands on the front thigh or on your hips or sweep your arms up over head lengthening the sides of the waist. Stay for 5 breaths before repeating on the other side. 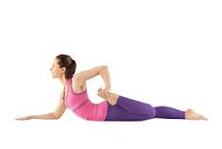 6. Ardha bhekasana (half frog pose). Come to lay on your belly, place your right forearm horizontally in front of your belly bending your left leg and taking hold of your left foot with your left hand, moving the heel towards the left hip making sure the knee is in line with the hip, drawing your belly in towards the spine as you lengthen your tailbone down towards your heels and lengthen up through your heart. Stay for up to 5 breaths before repeating on the right side. 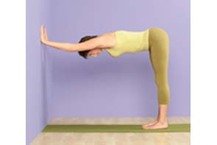 7. Ardha adho mukha svanasana (half downward facing dog at the wall). Come to a wall space and place feet hip distance apart, place palms of the hands shoulder distance apart against the wall spreading through the fingers. Bend the knees first of all to create the curvature in the spine, if you find when straightening your legs that your lower back rounds then stay with the knees bent moving the tops of the thighbones back to create length through the spine. If you can keep the lumbar curve with straight legs then moving the legs towards straight and stay for 5-10 breaths creating length through the full length of the back body. 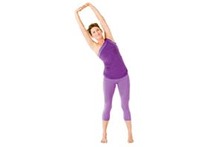 8. Parsva tadasana (sidebending mountain pose). Stand with feet hip distance apart, inhale arms up overhead, interlace fingers and press palms up towards the sky, lengthen the sides of your waist as you root down from the pelvis and legs into the ground, exhale over to the right rooting down even more into the left leg stay for 3-5 breaths returning back to centre and exhaling to the left. You can repeat 2-3 times really feeling the skin, muscles and connective tissue beginning to lengthen on the side body. This is a wonderful stretch for the quadratus lumbormum and latisimus dorsi muscles on the side body which often get neglected. This whole sequence should take 8-10 minutes to complete and works to release the muscles that assist to support and stabilise the low back. Enjoy! And I would love to hear how you get on with this little sequence, please comment in the comment section below.
2 Comments
2/19/2023 07:05:53 am
Thank you for all this great information about low back pain and how stretching routine can help! I really like your point about how stretches could help focus on wellness and coping strategies to make everyday life easier.
Reply
Leave a Reply. |
AuthorAdvanced clinical massage therapist and yoga teacher. Archives
December 2023
Categories
All
|
 RSS Feed